

When it comes to stabilizing existing foundations or supporting new construction, helical piles have become one of the most dependable and efficient foundation solutions available. Whether you're building a commercial facility, installing solar arrays, supporting a boardwalk, or repairing a settling home, understanding the installation process helps you know what to expect before work begins.
Unlike traditional concrete foundations that require extensive excavation, curing time, and significant site disruption, helical piles are installed quickly with specialized hydraulic equipment and can often support structural loads immediately after installation.
At Cantsink, our experienced installation teams have completed thousands of successful helical pile projects across residential, commercial, industrial, marine, and renewable energy applications. Here's a step-by-step look at how the helical pile installation process works.
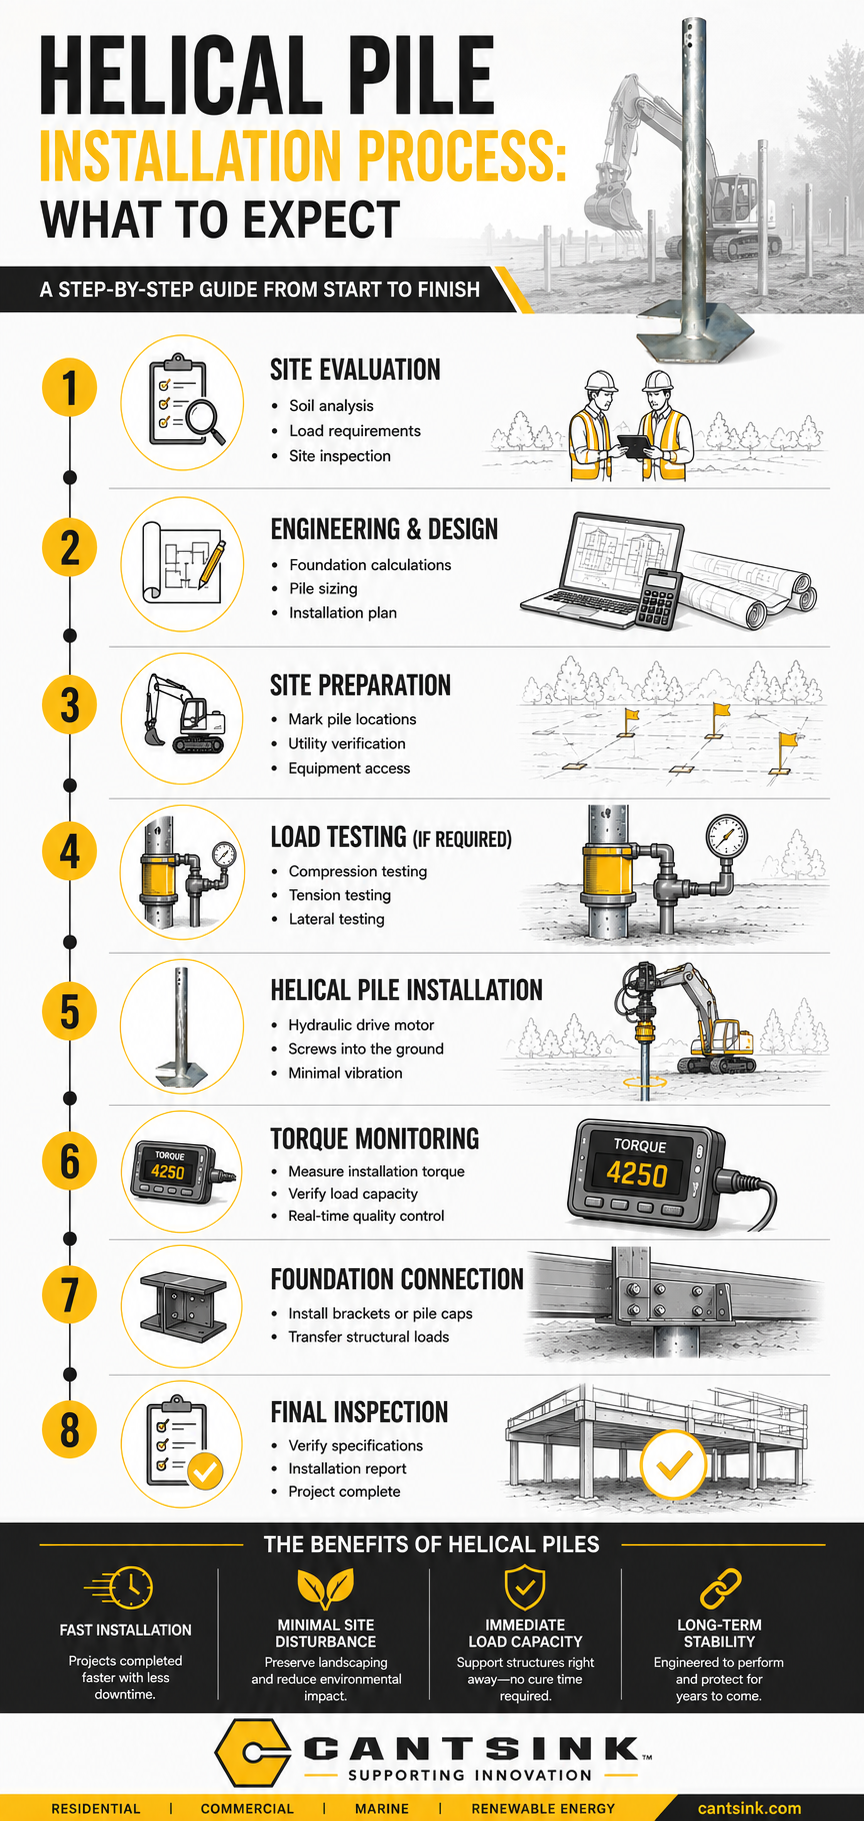
Step 1: Site Evaluation and Project Assessment
Every successful installation begins with a thorough site evaluation.
During this phase, engineers and project managers gather critical information about the site conditions, including:
- Soil characteristics
- Existing structures
- Project load requirements
- Accessibility for equipment
- Groundwater conditions
- Environmental considerations
For foundation repair projects, technicians also inspect the existing structure to identify:
- Foundation settlement
- Cracks in walls or floors
- Uneven flooring
- Doors and windows that no longer operate properly
- Signs of soil movement
For new construction, engineers review structural drawings to determine the number, spacing, and capacity of each helical pile.
This planning stage ensures every pile is installed exactly where it's needed to safely support the required structural loads.
Step 2: Engineering and Foundation Design
Helical piles are not one-size-fits-all.
Each project requires engineered design based on:
- Dead loads
- Live loads
- Wind loads
- Uplift forces
- Lateral loads
- Soil conditions
Engineers determine:
- Shaft size
- Helix plate diameter
- Number of helix plates
- Required installation depth
- Target installation torque
- Final load capacity
Because installation torque directly correlates with load capacity, engineers can verify pile performance during installation itself—one of the major advantages over traditional foundation systems.
Step 3: Preparing the Job Site
Compared to conventional foundations, site preparation for helical piles is relatively simple.
Most projects require only:
- Marking pile locations
- Removing surface obstacles
- Providing access for installation equipment
- Utility location verification
- Safety setup
Since excavation is minimal, there is significantly less disturbance to landscaping, pavement, nearby structures, or environmentally sensitive areas.
This makes helical piles ideal for projects where preserving the surrounding site is important.
Examples include:
- Existing buildings
- Historic structures
- Coastal properties
- Wetlands
- Parks
- Boardwalks
- Urban developments
Step 4: Load Testing (When Required)
Some projects require additional load testing.
Load testing helps verify that installed piles perform exactly as designed under actual loading conditions.
Testing may include:
- Compression testing
- Tension testing
- Lateral load testing
- Proof testing
These tests provide additional confidence for engineers, contractors, and building owners—particularly on large commercial or infrastructure projects.
Step 5: Installing the Helical Pile
This is where the actual installation begins.
A hydraulic rotary drive motor rotates the pile into the ground much like a giant screw.
The helix plates literally pull the pile downward through the soil with very little vibration.
Unlike driven piles, helical piles are not hammered into place.
Instead, the rotating action creates:
- Minimal noise
- Minimal vibration
- Reduced soil disturbance
- Faster installation
During installation, each section of pile is monitored carefully.
As the pile advances deeper into the soil, extension shafts are added until the engineered bearing layer is reached.
The installation continues until the specified installation torque is achieved.
That torque measurement confirms the pile has reached the required load-bearing capacity.
Step 6: Monitoring Installation Torque
One of the unique features of helical piles is real-time quality verification.
Throughout installation, crews continuously monitor installation torque using calibrated hydraulic equipment.
Torque readings help verify:
- Soil strength
- Bearing capacity
- Installation depth
- Load requirements
Because torque correlates directly with pile capacity, installers know immediately whether the pile meets engineering specifications.
This greatly reduces uncertainty compared to traditional foundations that often require separate load testing after installation.
Each pile's installation data is typically documented for project records.
Step 7: Connecting the Foundation
Once the piles reach their required capacity, crews install the appropriate connection brackets or pile caps.
Connection methods vary depending on the application.
Examples include:
New Construction
- Concrete grade beams
- Pile caps
- Structural steel
- Concrete slabs
- Wood framing
Foundation Repair
- Foundation underpinning brackets
- Wall stabilization systems
- Lift brackets
- Adjustable foundation supports
These connections transfer the building loads directly into the helical piles and ultimately into stable bearing soils below.
Step 8: Final Inspection and Documentation
After installation is complete, the project undergoes a final inspection.
Crews verify:
- Pile locations
- Installation depth
- Torque records
- Bracket installation
- Structural connections
- Overall project specifications
Many commercial projects also receive detailed installation reports documenting:
- Torque logs
- Installation depths
- Pile identification
- Load capacities
- Engineering compliance
This documentation provides valuable records for future maintenance and project verification.
How Long Does Helical Pile Installation Take?
One of the biggest advantages of helical piles is speed.
While project timelines vary, many installations can be completed in:
- Residential foundation repair: 1-3 days
- Commercial foundations: Several days to a few weeks, depending on project size
- Solar projects: Hundreds of piles can often be installed in a single day
- Marine structures: Varies based on access and environmental conditions
Unlike concrete foundations, there is no curing period before structural loading.
Once installed and verified, helical piles are ready to support the structure immediately.
Benefits of the Helical Pile Installation Process
Compared to traditional foundation methods, helical pile installation offers numerous advantages:
Faster Installation
Projects move forward without waiting for concrete to cure.
Minimal Excavation
Less digging means reduced labor, faster cleanup, and less disruption to the site.
Immediate Load Capacity
Structures can often be loaded as soon as installation is complete.
Installation in Difficult Soil Conditions
Helical piles perform well in many soil types, including soft, expansive, or unstable soils, when properly engineered.
Year-Round Installation
Because no concrete curing is required, installations can often proceed during a wider range of weather conditions.
Environmentally Friendly
Reduced excavation minimizes soil disturbance and helps preserve surrounding vegetation and landscapes.
Predictable Performance
Real-time torque monitoring provides immediate confirmation of installation quality and load capacity.
Industries That Use Helical Piles
The installation process described above supports projects across many industries, including:
- Commercial construction
- Residential foundation repair
- Utility infrastructure
- Solar energy
- Telecommunications
- Marine construction
- Boardwalks and piers
- Bridges
- Municipal infrastructure
- Industrial facilities
- Oil and gas
- Transportation projects
Their versatility makes helical piles an ideal solution for projects where traditional foundations may be impractical or cost-prohibitive.
Why Experience Matters
While the installation process may appear straightforward, successful helical pile projects depend on proper engineering, specialized equipment, experienced installers, and precise quality control.
Incorrect pile selection, improper installation torque, or inadequate load verification can impact long-term performance.
Working with an experienced helical pile contractor helps ensure your foundation system is designed and installed to meet project specifications, local building requirements, and long-term performance expectations.
At Cantsink, our team combines engineering expertise with decades of installation experience to deliver dependable foundation solutions for projects of every size. From residential foundation stabilization to large-scale commercial, marine, and renewable energy developments, we provide customized helical pile systems backed by proven installation methods and rigorous quality standards.
The helical pile installation process is designed to be efficient, precise, and minimally disruptive. From the initial site assessment and engineering design to installation, torque verification, and final inspection, every step is focused on delivering a stable, long-lasting foundation.
Whether you're repairing a settling structure, supporting a new commercial building, installing solar infrastructure, or constructing in challenging soil conditions, helical piles offer a fast and reliable alternative to traditional foundations. Understanding what to expect throughout the process helps property owners, engineers, and contractors plan with confidence and appreciate the long-term value these innovative foundation systems provide.

